I began the week by attending our first technical workshop of the year, where we loosely discussed the structure of the year and the software/techniques we will be primarily focusing on. A challenging and promising year is ahead of me! (I hope!). Unlike in previous years or experiences, I along with many others will not have shot photographs in the RAW format meaning that all images now will have to be processed in advance.
Shooting in RAW as a style/technique will mean the image file itself will contain a rich and unrestricted amount of photographic data that has been captured and processed from the camera itself. These untouched and uncompressed image types mean that special software has to be used in order to even view the image. Raw footage literally means (from my understanding) that the camera captures all the different information that is recorded meaning that it has to be processed and compressed in order to produce the workable and easily accessed JPEG. RAW and unprocessed images can’t be printed or edited with conventional image editors. This year when we shoot RAW images, we will use industry standard software such as Photoshop and Bridge. There are various benefits to be reaped when shooting RAW photography, for instance, when images are converted into standard file types like JPEGs; the original image data such as exposure, brightness and white balance are lost or distorted thus lowering quality and control of the image itself. RAW and untouched images provide a much wider scope for manual adjustments and manipulations without this loss or depletion of quality.
As a general point, throughout this year, we will mostly shoot in manual using DSLR cameras such as the Canon 700D meaning that we have complete control over important settings and conditions in which we can shoot our images.
Manual Exposure:
Having complete control over how bright or dark an image appears to be… Image exposure is affected by 3 different elements and by-products of photography.
Aperture: Is a function of the Camera lens that relates to how much light is let into the lens and how open or closed the iris is, Aperture is measured in F.stops.
For example,
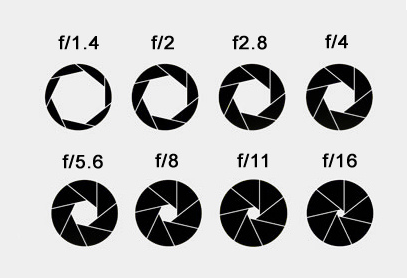
F.3.5 = Iris is open wide, allowing lots of light into the lens (Shallow depth of field)
F.22 = The iris is closed mostly, restricting the amount of light that enters the image sensor (Broad depth of field)
-Altering the aperture of the camera lens changes the depth of field, the lower the F.stop (eg. F.3.5 – shallow depth of field) the smaller the depth of field and thus lowering the amount of the image that actually appears in focus.
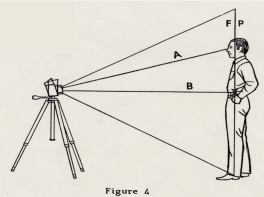
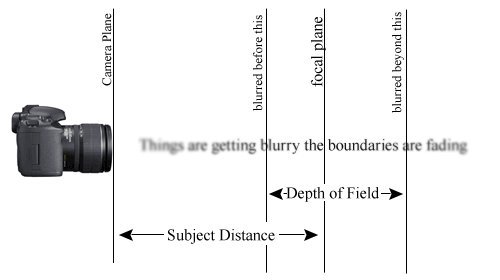
Focal Plane: space it takes for the camera to attain a point of full (sharp) focus.
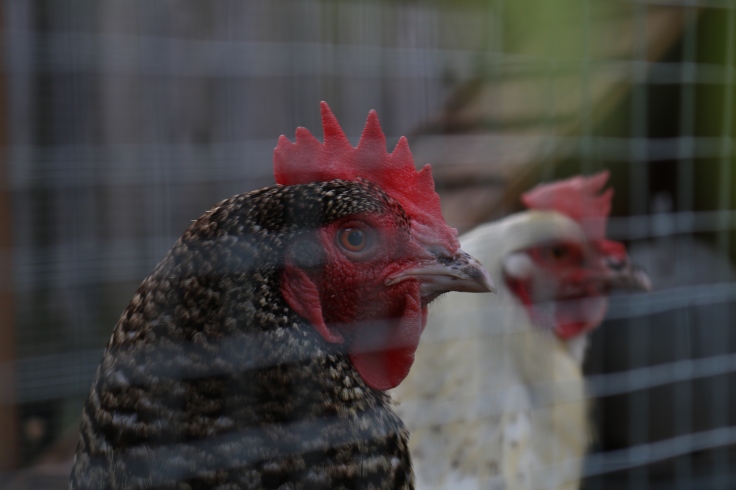
The depth of Field: The distance between the camera and what is in focus, where it relates to the focal plane. (insert cool depth of field photography here)

Shutter Speed: A function of the Camera body, referring to how fast the shutter opens and closes and thus, how much light is let into the lens.
For example,
30 seconds = More light is allowed into the image sensor thus creating an image with higher exposure.
1/4000 a second = Less light is allowed into the image sensor meaning that an image appears less exposed thus making it appear darker.
-Similar to the aperture, changing the shutter speed creates a by-product. If the shutter speed is slower then it takes longer for the camera to capture the image leading to motion blur; distorted and out of focus. If the shutter speed is incredibly quick then the image will appear to be frozen and sharp; (Motion freeze).
ISO: (International Standards Organisation: A function of the camera that refers to the light sensitivity of the camera sensor.
For example,
100 = not very sensitive
500 = medium sensitivity
6400 = very sensitive
-A consequence of ISO adjustment is colour noise, the higher the ISO the greater the image noise; image noise makes the photograph appear grainy, pixelated and saturated. Colour noise is introduced as the ISO increases.
Erik Kessels –
Described as a Dutch art director and curator of amateur photography. Often recreating and reusing discarded images in fulfilling and exciting new ways. A recent project titled “24 Hrs In Photos” included the study and research of all the photographs that were printed in a single day. These images were then distributed in rooms that illustrated the sheer multitude of photographs that were printed in a singular day; amounted piles towered up walls and ceilings.


Another successful exhibition featured the “celebration of the photo album”. Titled “Album Beauty” the exhibition is mostly comprised of portrait style photographs that would be found in family albums. The exhibit itself was created in the style of family albums and polaroid photographs, appearing aged, torn and grainy in places. Images from various different ages were featured in an attempt to incite reflection and contemplation the physical medium that seems to be increasingly “rare and precious”. (Erik Kessels, 2013).
‘Brief’ Encounters
Today we also received our assignment brief for semester 1… “Portrait, Body & Object”, we have only discussed this in little detail but I am trying to think about possible topics I can photograph. I had an initial idea of exploring concepts such object and human resemblance as well as our emotional attachments to objects. I took particular focus in the exploration of Cars, I often find that the aesthetic features resemble the facial features of a person. I have also found websites and blogs that explore this…


I began by taking some images myself to illustrate this… I feel that the image tone, angle and colour of the images create a strong sense of aesthetics with may also enable me to explore themes such as fetishism and objectification.
References:
Amiya, (2011) aptnk.in. Available from: http://aptnk.in/2011/02/understanding-depth-of-field/ %5BAccessed 23 September 2016]
Grum, M.(2013) StackExchange.com. Available from:http://photo.stackexchange.com/questions/40683/what-is-the-difference-between-depth-of-field-and-focal-plane %5BAccessed 23 September 2016]
Kessels, E. (2013) KesselsKramer.com. Available from:http://www.kesselskramer.com/about %5BAccessed 23 September 2016]
Mac, A. (2012) Travel Destination Bucket List. Available from:https://traveldestinationbucketlist.wordpress.com/2012/07/03/how-to-photograph-fireworks/ %5BAccessed 23 September 2016]
Robinson, M. (2015) http://www.carthrottle.com. Available from:https://www.carthrottle.com/post/13-faces-on-cars-you-wont-be-able-to-unsee/%5BAccessed 23 September 2016]
The Anstendig Institute. (1985) THE FLAW IN ALL AUTO-FOCUSING CAMERAS. Available from: http://www.anstendig.org/AutofocusFlaw.html [Accessed 23 September 2016]

Leave a comment